Remote access#
A short description of possible work scenarios
From home#
From Linux computer#
VPN client installing#
VPN uses MFA - your email and staff password as credentials, and OTP code send you either via TXT or from special application. Please refer https://www.wgtn.ac.nz/digital-solutions/staff-services/core-tools-and-services/account-management/multi-factor-authentication-mfa-faq for details
Official Cisco Client#
Either download and install official Cisco AnyConnect client from https://vpn.vuw.ac.nz
Openconnect#
Starting from 2022 openconnect-sso has discontinued as all functionality is merged to upstream. If your Linux distribution provides openconnect version 9.0 or higher, install the following packages
sudo apt install openconnect network-manager-openconnect network-manager-openconnect-gnome
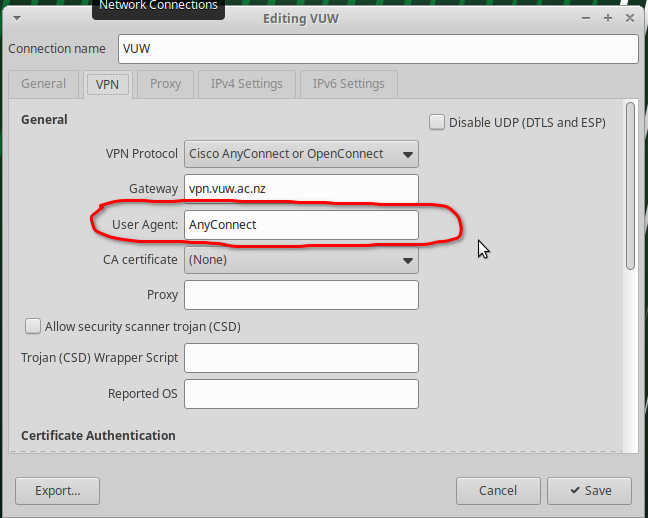
Create a new VPN connection of type ‘Cisco AnyConnect or OpenConnect’
In configuration dialog put vpn.vuw.ac.nz into ‘Gateway’ field and AnyConnect – to ‘User Agent’:

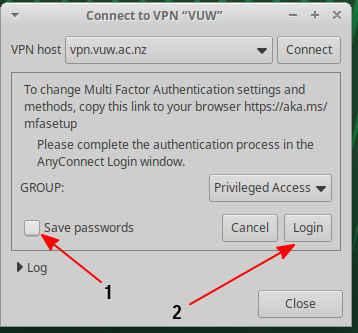
Then start connection and go through all MFA steps

Openconnect-SSO#
If your Linux distribution does not contain a new version of OpenConnect (e.g. Ubuntu before 22.10), install openconnect and openconnect-sso:
 sudo apt install openconnect
 sudo apt install network-manager-openconnect network-manager-openconnect-gnome
 sudo apt install python3-pyqt5 python3-pyqt5.qtwebengine
 sudo pip install openconnect-sso
First run
openconnect-sso --server=vpn.vuw.ac.nz --user=Your.Name@vuw.ac.nz
Several users have reported they couldn’t pass the second login screen when use email as username (the same issue appears in official Cisco client too), whereas staff login works for them. So if above command doesn’t pass through, you might give a try to:
openconnect-sso --server=vpn.vuw.ac.nz --user=login@staff.vuw.ac.nz
Go through login, password and OTP code. After that your credentials and cookies will be stored as default configuration so next time it should be enough to run
openconnect-sso
and it will activate connection automagically.
In case if you have several openconnect-sso configurations you might need to provide server and login information. Full command will look like:
openconnect-sso --server=vpn.vuw.ac.nz --user=Your.Name@vuw.ac.nz --browser-display-mode=hidden
(note, the --browser-display-mode=hidden option might be broken).
The VPN session can be terminated by quitting openconnect-sso - i.e. via CTRL-C.
Linux essential tools#
Most of tools you might need are included into standard Linux distributions by default. There is a good chance you’ve got them already installed.
You may need:
- SSH client:
sudo apt install openssh-client - rsync client:
sudo apt install rsync - x2Go client:
sudo apt install x2goclient - sshfs (to mount server folder over SSH):
sudo apt install sshfs - RDP client (for connecting to Windows):
sudo apt install remmina
From MacOS computer#
VPN client installing#
Navigate to https://vpn.vuw.ac.nz .
Log in with your university email address and password and get Cisco AnyConnect Client. Download, install and run it. Connect to vpn.vuw.ac.nz and use your university credentials when prompted for email, password and OTP code.
MacOS essential tools#
- SSH client: should be installed as part of base MacOS
- rsync client: should be installed as part of base MacOS
- x2Go client: download it at https://wiki.x2go.org/doku.php/download:start
- File manager for SSH: https://cyberduck.io/
- RDP client: install official from Mac App Store https://apps.apple.com/us/app/microsoft-remote-desktop-10/id1295203466?mt=12
From Windows computer#
VPN client installing#
Navigate to https://vpn.vuw.ac.nz
.
Log in with your university email address and password and get Cisco AnyConnect Client. Download, install and run it. Connect to vpn.vuw.ac.nz and use your university credentials when prompted for email, password and OTP code.
Windows essential tools#
- SSH client: PuTTy
- rsync client: https://itefix.net/cwrsync
- x2Go client: download it at https://wiki.x2go.org/doku.php/download:start
- File manager for SSH: WinSCP , Cyberduck
From mobile device#
Haven’t tested any yet
To university#
To high performance cluster#
After VPN connection established you may connect to any SGEES/ARC high performance clusters. You can see the list of our HPC’s here:
Using SSH for text mode access#
Run SSH from command line (Linux, MacOS or Windows 10 WSL): ssh username@sgees018.geo.vuw.ac.nz
In Windows without WSL use PuTTy: just start it and connect to any server
Using SSH for data transfer#
From command line (Linux and MacOS) you might use scp or rsync, or GUI tools: Cyberduck or WinSCP in MacOS and Windows, or “Go->Connect to Server” in MacOS
In Linux it varies:
Nautilus file manager has interface similar to MacOS (“Go->Connect to Server”),
whereas Dolphin has a direct support for SFTP, so the syntax would be: sftp://sgees018.geo.vuw.ac.nz/Volumes/
Using x2Go client for GUI#
Start client and create a new connection (assume you’re connecting to tara.geo.vuw.ac.nz):
- Session Name: some meaningful name, e.g. “Tara HPC”
- Host: tara.geo.vuw.ac.nz
- Login: your Linux login
- SSH port: 22
- Session type: XFCE
All HPC’s have only XFCE desktop environment installed, so check if you’ve selected it properly.
On Input/Output tab force Set display DPI to “96” for overriding issues with modern high resolution displays (such as giant fonts or icons)
Start connection and login with your Linux credentials.
Using rsync#
Several directories on sgees018 are shared via RSYNC. Connection is protected with password. if you need to transfer a lot of data to/from research storage ("/Volumes/…."), please ask Linux system administrator to create a personal share for you.
Rsync link to your directory will look like: rsync://doejohn@sgees018.geo.vuw.ac.nz/doejohn/ (note the rsync:// protocol!)
Connection test:
rsync -dt rsync://doejohn@sgees018.geo.vuw.ac.nz/doejohn/
Download file:
rsync -av --progress rsync://doejohn@sgees018.geo.vuw.ac.nz/doejohn/source/path/ /path/to/destination/
How to avoid of typing rsync password each time?#
- Create bash script:
 #! /bin/bash
 export RSYNC_PASSWORD=MY_RSYNC_PASSWORD
 rsync -av --progress rsync://doejohn@sgees018.geo.vuw.ac.nz/doejohn/source/path/  /path/to/destination/
- or save password in file (".ssh" directory in your home looks good enough for this)
 echo 'MY_RSYNC_PASSWORD' > ~/.ssh/rsync_pass
 rsync --password-file='~/.ssh/rsync_pass' -av --progress rsync://doejohn@sgees018.geo.vuw.ac.nz/doejohn/source/path/  /path/to/destination/
To Linux desktop#
At first you need to know your computer name (hostname) to be able to connect it. Either write it down or remember.
All SGEES desktops use the special naming convention in form: building-room-pc, so your desktop name might look like co123pc03.geo.vuw.ac.nz
Please be aware - there is no way to power on your university computer remotely.
Most times you don’t need to connect to you desktop for downloading or uploading any files. As we use network home profiles, all your documents stored there will be also accessible at any SGEES server (which is preferable way).
All Linux machines have SSH server running, however (for security reasons) access is open for system administrator only. If you believe you need to have remote access to your desktop (e.g. to run some very unique software installed only there), please ask Linux system administrator to add you to whitelist on the particular computer. Also there is an option to use x2Go for starting graphical session (after installing x2Goserver on the particular desktop)
To Windows desktop#
For Windows the different naming convention is used: school-service_tag.domain, so your Windows computer name should be similar to GEES-GFU468.staff.vuw.ac.nz
Start remote desktop (RDP) connection to the desktop and use your staff credentials. You might need to prepend your login with *staff* (so your login will be: staff\username) to give RDP client information about your domain.
RDP client is included into any version of Windows as one of standard components, whereas for other O/S you need extra tool: Remmina for Linux, or RDP client for MacOS.
To Windows research drives#
While keeping VPN active you may relatively easy get access to your university research volumes. Please be aware of network speed and connectivity: this case all your file operations will go over Internet connection so for large files it might be slow and unresponsive, also please check if it will not eat all your monthly Internet traffic (if you’re not sitting on unlimited tariff)
Note the login name conventions. If there is no special entry for domain, use your user’s name with “staff” prefix: staff\username
From Linux and MacOS#
From Windows#
Run Windows Explorer and paste the following in address line:
\\vuwstocoissrin1.vuw.ac.nz\VOLUME_NAME
You can add add address to your Explorer bookmarks (“Favourites”) or map network folder, however should avoid of reconnecting them on each logon. Without VPN they might show unpredictable behaviour.